The Hobbit - An Unexpected Journey....
Yay painted models! Like, actually finished, painted models! Ok, fine they are just gaming models for the table top.. and not that well done to be honest. But still.. first painted models for the year and honestly much needed atm.. With all the unpacking and trying to get settled, plus all the running around over the holidays etc.. it has been a chore to sit down and paint something.. Really it has!
So to get some models done and dusted is very good news for me. Hopefully this is a start of a momentum to get a lot of things finished!

To start with.. I picked up this Hobbit LE boxset after Christmas. Plan was to pick it up in time for Xmas, but the poor guy running our local store was stuck and thus I did not get a chance to. Probably my fault for leaving it for absolutely last second ( there are reasons, but none that I want to talk on a blog about unfortunately ).
Reason for the purchase was to get the little guy into wargaming. And also to have an excuse to pick up some new models :) Am always a sucker for new models.. and I have seen enough tutorials around showing them off that well, why not pick them up and do a batch of my own. Check out what Corvus was doing with his first batch of Goblins, or check out what Garfy has to say on the whole range over at Tale of Painters! I keep going back to these posts to check them out, and see the different styles being used. All are great and helped to inspire me to keep going :)
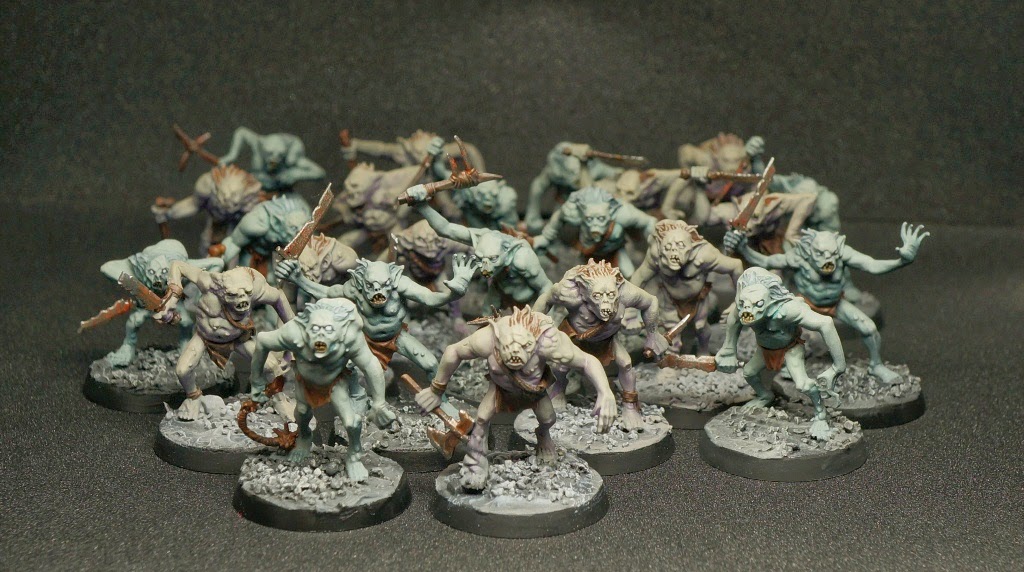
First batch ( picture above ) was done very quickly. I think maybe 4 hrs all told for the 12 of them. Most of the time was actually spent waiting for the putty on the bases and the white glue on top of the rocks to dry. To which I let that sit for about 3 or 4 days.. not because it needed it just because I was too busy with other things :)
For colors though I tried a purple to dead flesh transition on them. Not the best run, but it came out OK I think. Had a bit of a thinned version of purple wash going on them as well. Most wood/leather sections got the same brown treatments with some delvan mud washes. Swords with metal colors.. but I did try the new technical color from GW, Hyza Rust. Have to say that I like it.. gives the color I like from the CMON tutorial for 3 step rust. Just washed it with some thinned brown ink and drybrushed more silver on top.
Only part that I really hated after doing it was the hair. I should not have painted it brown. Stupid move there, wrecked the image of the models for me. Though I used some more of the GW dry paints to just drybrush over it a bit more. Liked it a bit more.. and like the rough painting style that comes with the drybrushing on these models. Makes them stand out a bit more and no effort really needed.. great for gaming pieces that a little one might be manhandling later on.

The second batch of 12 goblins took me far longer to paint.. maybe 6 or 7 hrs in total. But this was due to me punting around with ideas on colors again. Settled this time with a base of Dark Sea Blue instead of purple. Though I also did not drybrush as much on top of these guys with other brown/beige colors it is still apparent on a few pieces all the same.
Rest of the pieces were done the same though, but I really like how these came out better. Not sure if I will continue like this with the last 12 + captain + grinash + scribe... but will see. Might go another route altogether for them just to make them look really random.
Biggest thing some might notice.. I didn't dot the eyes. These are gaming pieces for me.. I don't think they need it nor warrant it. Will see what the little guy says when he looks at them while we try to play.
You can see in the top photo, and again ( same photo ) below.. how they look together..
I think they work nicely as a mix. Maybe the next ones will be a bit more red or blue instead of the brown and greens that have creeped up here. I think the variation will be cool for gaming. Also makes it easier for me if I ever buy more goblins to play with as they don't have to match anything specifically.
Last bits were the wooden ramps for the Goblin Town that I painted up quickly. Lots of wet on wet painting here with browns, whites, beige
, greens, blues, blacks, etc.. you get the point. And then some drybrushing with a massive brush to bring out some of the details.

Not the best, but again for the table it will look nice. I still have the massive platforms to do, along with the Goblin King's chair to finish up.
All in all I had a lot of fun with these guys, and they are helping me to get back at painting up some Table Top models, and bring my speed back as well.
And to add to the inspiration I spent last night watching the Hobbit with the Mrs. I expect to watch it a few more times for inspiration on how to paint up the dwarfs which will be based a bit differently also. But let's see how long this takes, and how it goes.
Now to get back to work, and to continue to wait for my Wayland Games package that will be bringing me goodies from Christmas online shopping!
Hope you all enjoy this.. and will finish with a shot of the goblins on their ramps sitting in my display case for the time being! Enjoy the new week, and happy painting!


Really like these, the colour palette looks spot on to me!
ReplyDeleteNice job look good to me. very pale but cave dwellers would be.
ReplyDeleteThese are awesome. Great to see some Hobbit models on your blog.
ReplyDeleteHola
ReplyDeleteBuenas minis,me gustan los tonos de las pieles que le as dado
un saludo
Great work Mr Lee , i love it !
ReplyDeleteTurned in to a nice little horde sir!
ReplyDeleteThey turned out quite well, love the colouring.
ReplyDeleteExcellent work! Did you airbrush these or normal brush? The colours looks to have blended very well.
ReplyDelete