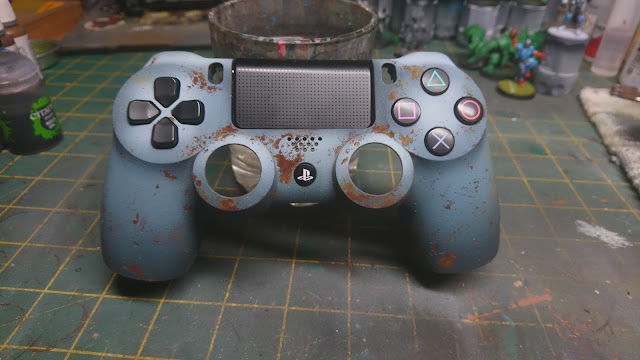
PS4 Controller/Headset mod/paint
Again an older piece of work that I did up cause I was bored or something.
Actually the headset I did cause I had a spare faceplate for it, and I thought it would be cool to spice it up a bit. And it turned out so well that I had an itch to do it to something else.
Turns out my son soon there after wrecked one of the controllers from mashing the X button too hard while playing Lego Jurassic Park.
So with it not working and me looking to do another mod, this was a win/win for me. Controller is already not working nice, so I can wreck it without worries. Or if I don't cock it all up I have a nicely modded controller!
So after a bunch of swearing and sweating.. I was able to get the cover off. Actually I have to say that it was not so bad and I could do it again but I would change my approach a bit next time however so as not to cause gouges in the seams.
After a quick grey primer or 3.. I then had to think on what I wanted to do. And for this I was aiming to go like the headset and do a rusty controller. So I pulled out the ModelMates Rust bottles and just slathered it all over the controller.
I do regret this now though as I then read and saw that ModelMates is no longer operating.. so the stock I have is the last I suspect I will have unless there are vendors with stock left. Cause it is a great product, but I know that the owner was having health issues so there is potentially a reason that he stopped trading.
Once it was covered and dried. I would go and do a ton of AK Heavy Chipping Fluid over the controller. Like everywhere over it. And let that dry overnight this time ( usually for tanks I can let it go in an hour or so.. but this was to take some more abuse so.. ).
After it all had dried I went and did a pale blue scheme overall with the airbrush. Trying to make the areas near the holes a bit brighter overall. No idea what I was doing here, but I was having fun while doing it so alls good in my book in that regards!
From here I would do and begin the chipping process. Removing a bit of the top levels of paint to reveal the rusty sections below. I also then put in ( temp ) the buttons to see if I should paint them or leave them basic.
In the end I left them only because they would take a lot of abuse and could rub off fast regardless of how much varnish I might apply later on.
When all was said and done, some massive amounts of gloss varnish were applied. With each layer given an hour to dry and cure before another was applied. And then as a final touch a few layers of matte varnish to bring it all back down in reflections.
My hope was that all these layers of varnish would assist in sealing the colors in and keep them from rubbing off.
I can say that after a month or so of playing with it since sealing it up, that it did not work. It might be good enough for my son to button mash more on Lego games. But with my fat greasy palms, the paint is beginning to lift, and get sticky on the sides. Will need to reseal it at some point, and have already made it permanently his personal controller ( which he thinks is cool cause its a special color ).
Lesson learned on this. And if I were to do it again ( not likely atm as all the controller work nicely ) then I will need to find alternative methods then.
For now, I am off to Duke of Bavaria to set up for the first time by myself as a trade stall! Wish me luck and hope to see lots of great pieces painted while there! Oh and maybe sell a few models while I'm at it.


I kinda wanna do that to my steam controller but i'm too scared to f up the controller and haptics!
ReplyDeleteThis is the only reason why I don't go and do it to the others. Though since this controller was already messed up, there was little I was concerned about if it went horribly wrong.
DeleteThat said, the paint does not sit well after prolonged use. The oils in the hands are taking the paint off now.. which I have ideas on how to prevent that some.
Now that colour scheme would look sweet on the PS4 console itself.
ReplyDeleteI am considering it. Though I am thinking of picking up a second PS4 to try it on and see how it works out, as I will then be looking to extend the HDD space on that second PS4 to have a much larger capacity. 500 gb is just not enough, and I suspect neither is 1 TB.
DeleteI have just received a loan of $800,000 from this man Dr. James Eric in less than 24 hours. He is a sincere and trustworthy gentleman I admit For all your loan application needs, contact him at his: Email: financialserviceoffer876@gmail.com Whatsapp: +918929509036 For more information.
ReplyDelete