Diorama scene for Tanks
If you haven't been noticing that I have been fascinated with tanks of late, and it is now moving onwards to making small dioramas alongside them.
The first of what I suspect will be many small dioramas started a week ago, and took off at quite a quick pace.
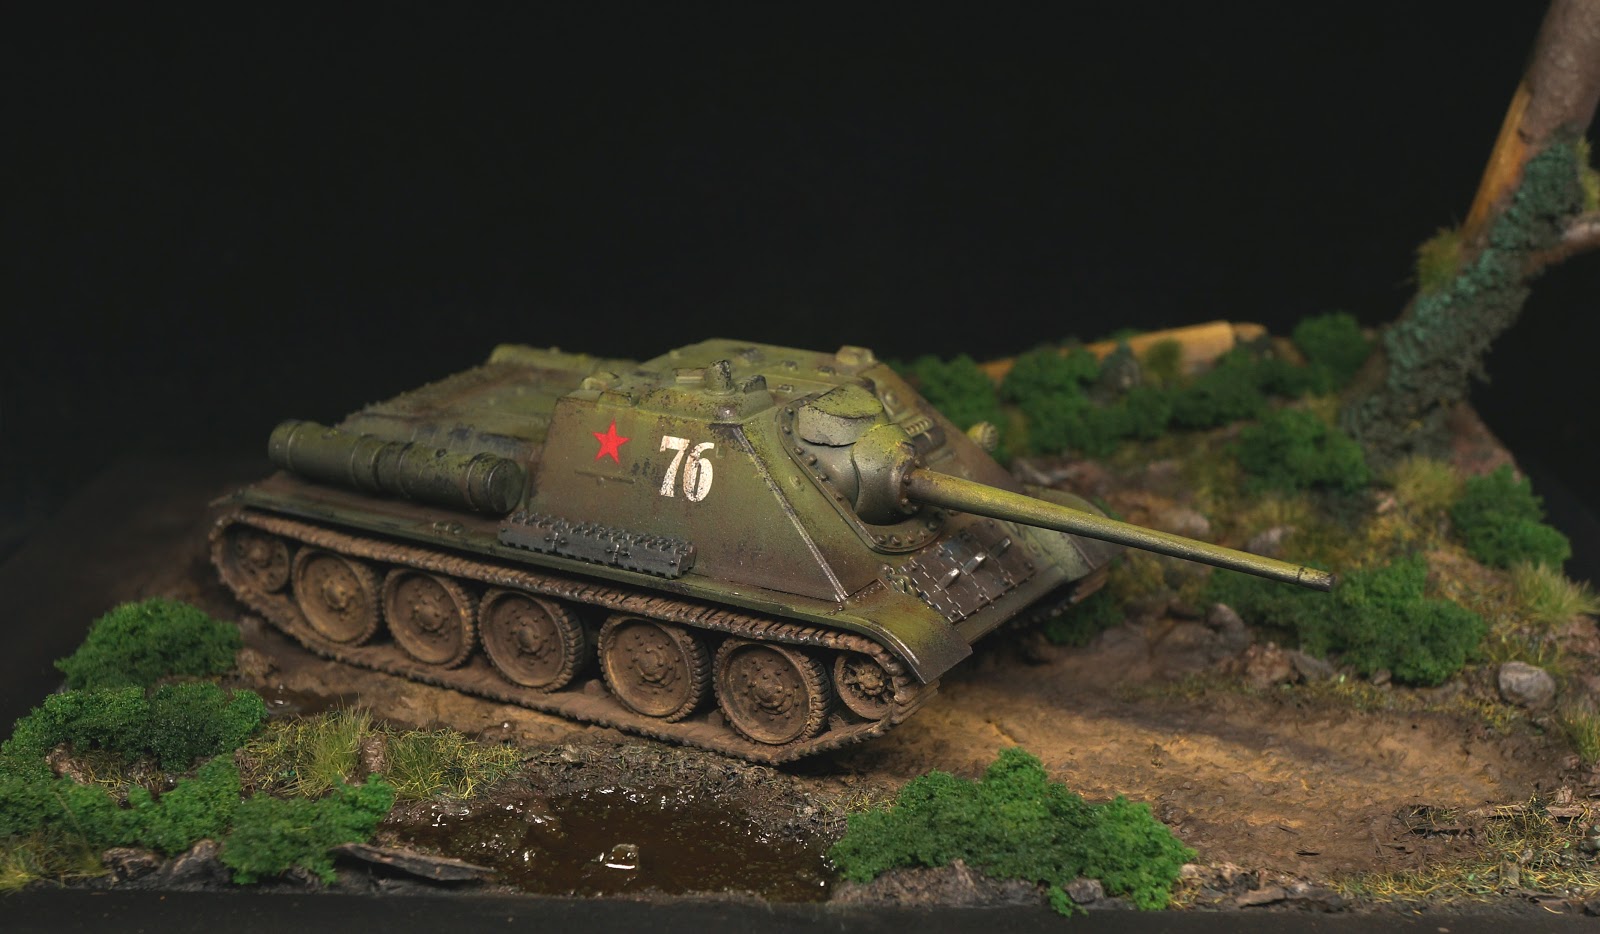
You can see one of the final photos of the piece shown with a soon to be talked about vehicle. And I still feel that there is more to go on the scene itself ( such as maybe a few troops up on the hill perhaps? ).
How'd it all start though?

Actually it started with a trip to John Lewis of all things to be honest. It was there that I saw a black picture frame for 7 quid, and thought how cool would it be to have that as a base for a scene for my tanks. So on an impulse buy, that is what I did! I had seen this trick made from other scale modellers before, so this is not something that I can say is a piece that I thought up ( though I wish I had! ).
From here though it was a matter of filling up the void, and laying out my scene. I had a look through some of my diorama books at home, some photos of tanks, and finally settled on a forest-esc like setting.
First step with filling the void was finding the appropriate sized cork needed to do just the job. And then planning out which direction I was looking to have the scene push. A left to right scene was decided, but with the height of the setting to be on the top right, with sight lines to push you back down to the middle.
The front left would be broken up a bit, and maybe some water tossed into it to give it something else visually.
Both of these I tried to set up with the rise and fall of the cork, and then tried my hand at filling or sculpting the rest with milliput around it all.
The tree twigs were added to put some weight on that top corner of the base as well, though I probably should have sculpted on them a bit to give them a bit more texture than what they provided.. but I still had plans to correct that even.

Once the plan was set ( milliput drying makes things a bit more permanent ) I then began to add some sand, gravel, and larger stones to the base. Again to break up the base a bit further. I also began to add dirt to places throughout the base, and give the whole thing a bit more texture..
Sadly no photos of that before I went on to prime and paint this. Honestly I was still unsure if this whole idea was going to take hold, and not sure what direction this was going. So at points I just kept going instead of stopping for photos.. so apologies there..

First layers of paint.. and this is where I was having a lot of fun with the piece. Because at this point I was not using acrylics on the base, but instead doing the entire base in oils to get a rough sketch and idea of where it was going.
It gave me a great idea of the feel for the piece and really invigorated me on how it would be looking later on, though without the foliage happening right away. Although the above photo was very wet looking due to the oil not dried yet, I would give it a day or 2 to set before I would cover it in varnish and start in on the other colors and next steps.
But first.. some photos of other vehicles on it to give it a go at how it can work for more than just a single piece ( which is the intent to have it work for of what I am working on over time ).


Without the foliage the desert camo pieces were still looking ok ( though a bit dated already compared to my newer paint jobs ).
I would even see how it would be within my photo booth and with my proper camera instead of my cell phone..


I had posted these photos online, and asked which people liked the most. The SU85 and the Halftrack were voted on the most overall, with the others not even mentioned.. says a bit about my paint jobs on them perhaps ;)

With some photos tests happened, and me liking it more and more, I began to add the other elements to the base. Water effects to the bottom left corner. Foliage to the base in different areas.
The first parts for foliage was some scatter grass in areas, and the moss on the trees. I had taken the floral sponge flock, mixed in some dark green, and varnish, and used that as a paste to cover sections of both of the twigs. Once dried I did drybrush it with some off green oil colors to give it a bit of a lighter look overall.
I will say that at this point it was quite bright, and out of place as well. But I had plans to add some bushes a bit more. And the plan was that this would help to solidify the colors and make it get tied in a bit further.

Thankfully I think the addition of the more solid green bushes did help quite a bit. I would then go and lay down some darker washes via the airbrush to the shadows of the bushes, and soft tone wash spray on the top section.
Helped to tie in the colors a bit further and kill off the brightness of it further as well. Which moved me to take more photos of the scene both with the SU85 and the M10 on the scene to see how they fit on it.


I think overall they both can fit nicely ( though the tracks on the M10 need doing, and the SU85 could have some updates as well ). But I do believe that the overall look, and feel that I was aiming for has come through on this piece. And I did learn a lot on how to set up scenes a bit better for larger projects. Something that I hope to move onwards with on my larger display piece as well. Hopefully I can make more of these kind of scenes as well for other projects. Such as maybe an urban setting, and a desert feeling. Something that will allow me to play around with different tanks and have more scenes for me to take photos of them in.
One comment I did receive about this, and I will seriously consider it for later on.. is to make or paint up a backdrop for the scene and remove the back background even further. I see pros and cons for that, but need to do more digging around on it before I commit to it at all!
Hope you enjoyed this, and hopefully I will have more things to post up about as the week progresses!


The mini Diorama is great. It works with each model just as good as the previous one.
ReplyDeleteThanks Clint. I hope to add to it a bit more, or create something else on it as well. But am happy with it for a first pass!
DeleteExcellent mini diorama. I like the SU85 best, because it integrates in with the scene that much more. (because of the similar dirt on the treads).
ReplyDelete