Chaos Dwarf K'Daai Destroyer Project
So a good friend of mine was looking to expand his Chaos Dwarf army. One of the main items that every Chaos Dwarf general should have though is the K'Daai Destroyer unit available.
This page is going to show the progress of that project.
Very few comments will be made as to why it is that I am making it. I swear.. somewhat :)
Progress has begun today, January 31st, after the package containing the parts needed for this project finally arrived. The snow, nor lack of intelligence on the part of the courier could prevent it from reaching my home to allow me to get to work on it straight away!
The brief for this is simple.. enough.. to have the destroyer look like it was summoned.. and to have the summoner on the diorama also. In this case, I will try to incorporate the Summoner model to be removable if/when he wishes to just use it as a Deamonsmith or something in the future. The snails are there to add more atmosphere to the diorama.
Some beginning work in progress shots of the K'Daai Destroyer diorama..
You will see that the monster base is made out of balsa. Normally this would not be strong enough to hold the weight of this monstrosity of a monster due to being made of metal, however the darker brown board under it will help to distribute the weight nicely. Also it is a lot more rigid than balsa wood, though not sure what kind of wood it really is.
Also being out of balsa wood it allows me to try out some side lava spillage maybe also.. will see how it goes..
Depending on what my buddy thinks of this as the basing, it may mean that I am more or less finished with the base, and can actually glue things down, or have to rethink this whole thing and look at it from another angle. Will update when I know more..
----------------------------------
February 2nd Update..
So the client didn't like the initial layout of the destroyer. The beast was too far forward it seems, and the backside was too "blocky". Fair enough. So he was kind enough to provide me a drawing on how he would like to work out instead..
So from this, I have moved things around, and came up with the below..
Haven't heard back from him yet, but will see if this works. If it does, then I will begin the gluing process, and lock it down. I need to figure out how to do the lava aspect of it. So far it will probably consist of some GS around the feet to give a splash effect, a few bubbles randomly put also, and then covered in white glue to seal it all in, and to give it a smooth appearance. Couple Green Stuff ripples underneath might help also, so will play around with it and go from there.
Destroyer beast is not put together at the waist in the photo, but that process is starting now. He is having a nice little laydown at the moment waiting for the superglue to dry, and then will get stuffed with GS/Procreate, and have his mid section filled. Need to smooth over some of the previous areas also, or at least to give it some more definition than my finger prints. But it is coming along nicely.
So far the project has taken me 4.5 hrs to get to this point. Not too bad. Figured it would take about 5-7 hrs to create, so am glad to see that my estimations are getting closer to reality.
----------------------------------
February 7th Update..
So a little more work has been done.. nothing much though.. just some initial painting on the first snail to get an idea as to how it might turn out.
Idea here was to prime it black, and then start with the shell. Actually, I started with the shell cause my airbrush was already loaded with VAC Radome Tan color, and so it looks about right to use for the base shell coloring. From here, just before the color ran out, I used the last remnants of it to dust over the snail skin area. It came out as a very dull or dead looking grey coloring, which was pretty cool! So I added some washes with GW Purple, Red and Delven to add some shading to it, and almost bathed the shell itself in Delven.
End result is what you can see below..


Still work in progress, however it is well on its way. Just need to do the skin for the dead man in his jaws there, and do up the eyes, mouth area. Rest will probably stay as it is. Second one will come out more green I think, and then we will see which one gets to be included with the destroyer base in the end.
----------------------------------
March 5th Update..
So work continues on this guy, albeit a bit slower than I would like. Mostly this is due to the Dark Elf army commission, however that has made some pretty serious headway over the past few weekends, and an ending for it is in sight now.
So with that, and to give me some breathing room for a change, I worked on the K'Daai Destroyer a bit more.
Not much done here, aside from the Lava base has been started now.


And then some coloring on the K'Daai also..

For the K'Daai, the feet, hands and face are going to be extreme hot spots. Feet as they connect to the base, sucking in the lava that sustains it.. Hands are hot due to hitting with the power of a thousand suns.. and face is hot cause he looks like he is constipated in his current pose.. and well why not..
Should be fun, and we should be seeing more updates coming out of it more as the Dark Elf commission finishes up over the coming weeks...
----------------------------------
March 12th Update..
Another weekend has passed and thus more work on the K'Daai Project has occurred!
This time around it was the finalization of the Summoner, the Lava Base, and the Snail. Though the Snail needs to get a bit more work done on him especially in the green department. The comments, to quote Burock, was that it looks like Jello gone wrong.. so need to fix that. Also to make the human cadaver paler, but it is quite pale already, but with some decent shading that is overshadowing the work. Dunno, will make adjustments as required then.
The Lava base was given a treatment of Tamiya Clear Orange. I saw this on a video tutorial from BuyPainted.com. Although the guy sounds like a Vampyre out of a 70s movie, he knows his stuff! The Clear Orange really made the colors pop, and I have since seen more uses for it. Such as for candle flames on a certain Cauldron of Blood forth coming also.
Summoner was finished up with the robe being red, and the skin recipe from old being used extensively here. I think his bald head came out great all things considered. That means, it is a large flat surface, and I have not had the best luck with it in some cases. So I was really pleased with how it came out. Same with the chestplate, and the skeleton staff.
Also the menhir stones had their runes painted up to be glowing.. or at least that is the plan. Like a internal lava to them, and of course I added more clear orange and even red to them to give them that glow or shiny look to them. I think they look good, but will let Burock state if it is of not!
But whats with all the chatting.. here be the photos!!! As usual.. in WIP format..
So more progress expected for this in the coming weeks.. who knows.. if the speed of this project keeps up, we could see it playing out at Izmircon after all! That is if my own projects don't overshadow it :)
----------------------------------
March 13th Update..
OMG.. another update? Really? Ok.. but its a small one..
First up.. updated the menhir behind the snail.. and also touched up the greens on the snail..


But more importantly.. I have put brush to Destroyer!!!
Starting with the legs and stomach area, I have begun to layer in the yellows to the deeper areas. This started with a quick coating of GW Foundation Yellow, then a quick splash of VAC Gold Yellow. From here, I started on the Oranges using the GW Foundation Orange. Though I was skeptical of this part as it was a bit darker than the VGC Orange I was using previously, but it had a much better quality to it that allowed me to do some wet blending.
The orange was allowing me to place a dab of orange onto the model, then taking a wet brush, slowly blend it into the yellow around it. Making it almost transparent in some areas. This is probably a normal technique for other painters, but for me this was new, and had a great effect on the model itself. My left arm however is a bit tired from trying to hold the model for the painting session, so in the end I had laid the model down on the insulation foam that it came with. I then used the stick attached to its feet to move it around so that I could get to some of the harder to reach areas.
Will be interesting to see how this goes.. once this layer of orange is done, I will attempt to make another layer of a brighter orange, and then begin work on the scale area which I will do in red to begin with. Before hitting the upper areas in black. Should look nice!
I suspect I will get more work on this throughout the week.. who knows.. maybe it will be ready for Izmircon afterall.. and I can collect my monies while there.. which I will promptly spend at the bar most likely :)
----------------------------------
March 23rd Update..
Well well well.. guess what we have here.. yes.. indeed.. we have a finished K'Daai Destroyer!!!! Only thing to do now is just varnish this bad boy up, and deliver him to his waiting owner..
As you can see, a lot happened since the last update.. things moved along on the model faster than I had anticipated.. and so.. here we are.. oh and better photos will be taken over the weekend for it.. hopefully getting to show it off in its true coloring..


----------------------------------
Final Update..
Final shots of the beast just prior to taking him to the client in Izmir.. to face off against it in the IzmirCon Tournament..


And that is another project finished up..
This page is going to show the progress of that project.
Very few comments will be made as to why it is that I am making it. I swear.. somewhat :)
Progress has begun today, January 31st, after the package containing the parts needed for this project finally arrived. The snow, nor lack of intelligence on the part of the courier could prevent it from reaching my home to allow me to get to work on it straight away!
The brief for this is simple.. enough.. to have the destroyer look like it was summoned.. and to have the summoner on the diorama also. In this case, I will try to incorporate the Summoner model to be removable if/when he wishes to just use it as a Deamonsmith or something in the future. The snails are there to add more atmosphere to the diorama.
Some beginning work in progress shots of the K'Daai Destroyer diorama..
 |
| Deamonsmith.. with some peach fuzz growing on his chin there. |
 |
| The diorama takes shape. |
Also being out of balsa wood it allows me to try out some side lava spillage maybe also.. will see how it goes..
 |
| Removable bases anyone? |
----------------------------------
February 2nd Update..
So the client didn't like the initial layout of the destroyer. The beast was too far forward it seems, and the backside was too "blocky". Fair enough. So he was kind enough to provide me a drawing on how he would like to work out instead..
 |
| Client's awesome sketch.. actually very useful.. |
So from this, I have moved things around, and came up with the below..
 |
| Set up.. take 2.. lets see how he likes this one.. and if I need to modify it more.. |
Haven't heard back from him yet, but will see if this works. If it does, then I will begin the gluing process, and lock it down. I need to figure out how to do the lava aspect of it. So far it will probably consist of some GS around the feet to give a splash effect, a few bubbles randomly put also, and then covered in white glue to seal it all in, and to give it a smooth appearance. Couple Green Stuff ripples underneath might help also, so will play around with it and go from there.
Destroyer beast is not put together at the waist in the photo, but that process is starting now. He is having a nice little laydown at the moment waiting for the superglue to dry, and then will get stuffed with GS/Procreate, and have his mid section filled. Need to smooth over some of the previous areas also, or at least to give it some more definition than my finger prints. But it is coming along nicely.
So far the project has taken me 4.5 hrs to get to this point. Not too bad. Figured it would take about 5-7 hrs to create, so am glad to see that my estimations are getting closer to reality.
----------------------------------
February 7th Update..
So a little more work has been done.. nothing much though.. just some initial painting on the first snail to get an idea as to how it might turn out.
Idea here was to prime it black, and then start with the shell. Actually, I started with the shell cause my airbrush was already loaded with VAC Radome Tan color, and so it looks about right to use for the base shell coloring. From here, just before the color ran out, I used the last remnants of it to dust over the snail skin area. It came out as a very dull or dead looking grey coloring, which was pretty cool! So I added some washes with GW Purple, Red and Delven to add some shading to it, and almost bathed the shell itself in Delven.
End result is what you can see below..
Still work in progress, however it is well on its way. Just need to do the skin for the dead man in his jaws there, and do up the eyes, mouth area. Rest will probably stay as it is. Second one will come out more green I think, and then we will see which one gets to be included with the destroyer base in the end.
----------------------------------
March 5th Update..
So work continues on this guy, albeit a bit slower than I would like. Mostly this is due to the Dark Elf army commission, however that has made some pretty serious headway over the past few weekends, and an ending for it is in sight now.
So with that, and to give me some breathing room for a change, I worked on the K'Daai Destroyer a bit more.
Not much done here, aside from the Lava base has been started now.
And then some coloring on the K'Daai also..
For the K'Daai, the feet, hands and face are going to be extreme hot spots. Feet as they connect to the base, sucking in the lava that sustains it.. Hands are hot due to hitting with the power of a thousand suns.. and face is hot cause he looks like he is constipated in his current pose.. and well why not..
Should be fun, and we should be seeing more updates coming out of it more as the Dark Elf commission finishes up over the coming weeks...
----------------------------------
March 12th Update..
Another weekend has passed and thus more work on the K'Daai Project has occurred!
This time around it was the finalization of the Summoner, the Lava Base, and the Snail. Though the Snail needs to get a bit more work done on him especially in the green department. The comments, to quote Burock, was that it looks like Jello gone wrong.. so need to fix that. Also to make the human cadaver paler, but it is quite pale already, but with some decent shading that is overshadowing the work. Dunno, will make adjustments as required then.
The Lava base was given a treatment of Tamiya Clear Orange. I saw this on a video tutorial from BuyPainted.com. Although the guy sounds like a Vampyre out of a 70s movie, he knows his stuff! The Clear Orange really made the colors pop, and I have since seen more uses for it. Such as for candle flames on a certain Cauldron of Blood forth coming also.
Summoner was finished up with the robe being red, and the skin recipe from old being used extensively here. I think his bald head came out great all things considered. That means, it is a large flat surface, and I have not had the best luck with it in some cases. So I was really pleased with how it came out. Same with the chestplate, and the skeleton staff.
Also the menhir stones had their runes painted up to be glowing.. or at least that is the plan. Like a internal lava to them, and of course I added more clear orange and even red to them to give them that glow or shiny look to them. I think they look good, but will let Burock state if it is of not!
But whats with all the chatting.. here be the photos!!! As usual.. in WIP format..
 |
| The lava base as it stands now.. with several coats of clear orange, yellow and red to make it pop! |
 |
| Smooth like a babies bum it is.. |
 |
| The green might be a bit bright, but its also semi glossed, so the light might be reflecting a bit too much off it.. |
 |
| Not glowing as much as I would like.. maybe another layer is needed? |
So more progress expected for this in the coming weeks.. who knows.. if the speed of this project keeps up, we could see it playing out at Izmircon after all! That is if my own projects don't overshadow it :)
----------------------------------
March 13th Update..
OMG.. another update? Really? Ok.. but its a small one..
First up.. updated the menhir behind the snail.. and also touched up the greens on the snail..
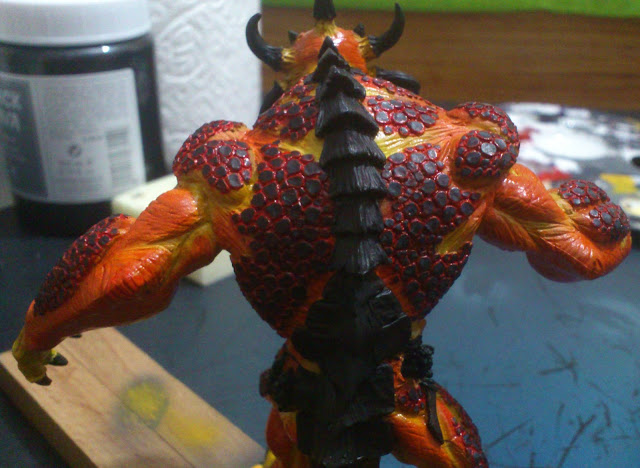
But more importantly.. I have put brush to Destroyer!!!
Starting with the legs and stomach area, I have begun to layer in the yellows to the deeper areas. This started with a quick coating of GW Foundation Yellow, then a quick splash of VAC Gold Yellow. From here, I started on the Oranges using the GW Foundation Orange. Though I was skeptical of this part as it was a bit darker than the VGC Orange I was using previously, but it had a much better quality to it that allowed me to do some wet blending.
The orange was allowing me to place a dab of orange onto the model, then taking a wet brush, slowly blend it into the yellow around it. Making it almost transparent in some areas. This is probably a normal technique for other painters, but for me this was new, and had a great effect on the model itself. My left arm however is a bit tired from trying to hold the model for the painting session, so in the end I had laid the model down on the insulation foam that it came with. I then used the stick attached to its feet to move it around so that I could get to some of the harder to reach areas.
Will be interesting to see how this goes.. once this layer of orange is done, I will attempt to make another layer of a brighter orange, and then begin work on the scale area which I will do in red to begin with. Before hitting the upper areas in black. Should look nice!
 |
| Shown under the normal lights of the room itself |
 |
| Shown under the lamp I use while painting.. |
----------------------------------
March 23rd Update..
Well well well.. guess what we have here.. yes.. indeed.. we have a finished K'Daai Destroyer!!!! Only thing to do now is just varnish this bad boy up, and deliver him to his waiting owner..
As you can see, a lot happened since the last update.. things moved along on the model faster than I had anticipated.. and so.. here we are.. oh and better photos will be taken over the weekend for it.. hopefully getting to show it off in its true coloring..
----------------------------------
Final Update..
Final shots of the beast just prior to taking him to the client in Izmir.. to face off against it in the IzmirCon Tournament..


And that is another project finished up..


I don't how i arrive to your blog, but this scene is great, the sculpt of the dewarf is a really good job, and the paintjob too.
ReplyDelete